Video recovery can be a daunting task for the inexperienced, but it shouldn’t be. With the right software, you can quickly restore deleted footage, repair complex video files, and recover corrupted files.
It doesn’t matter if your footage is corrupted or accidentally deleted. You can get it back with Recoverit. This article shows you how.
How to Recover complex video with Recoverit?
- Why Videos Get lost
- File transfer errors
- Formatting inconsistencies
- Sudden power loss
- Physical damage
- Human error
- How to Recover and Repair large-sized and complex videos?
- Step 1: download Recoverit
- Step 2: choose a location
- Step 3: scan
- Step 4: find files
- Step 5: file preview
- Step 6: save files
- Advanced data recovery
- Conclusion
Why Videos Get lost
Imagine opening your computer to play your favorite videos and finding that they’ve been corrupted. Frustrating, isn’t it? There are several reasons why your footage may deteriorate to the point that it doesn’t work at all. They include
- File transfer errors
- Formatting inconsistencies
- Sudden power loss
- Physical damage
- Human error
File transfer errors
Footage may suffer damage during the read/write process. This occurs with cameras during playback, recording, and file transfer from the source medium to a backup drive. Each digitized frame of video content comprises millions of bits (the symbols of machine code that power all digital devices). Every time these bits are accessed or transferred, there is a chance that at least one of them will be replicated the wrong way.
Formatting inconsistencies
wrongly formatted recording media may also cause footage loss or damage. This is because all recorders and cameras work with specific file and media architecture. This enables them to correctly locate and store clips and metadata.
If the storage device is wrongly formatted or formatted on a different device from the one recording from the camera, your footage will likely be damaged or lost.
Sudden power loss
video may be damaged if there’s a power cut during recording, playback, saving. This will likely occur if you shoot with depleted batteries. Each clip comprises headers and footers to help media players decide, for example, that data belongs to clip “a,” not “b.” If there is a loss of power before the data can be written onto a target medium, it will likely be corrupted.
Footage damaged this way may render the entire storage medium unusable. Usually, before a battery is completely depleted, the device will initiate a power-down procedure so the playback software can give the clip a footer to prevent media corruption.
Unfortunately, not all batteries support this functionality. Third-party batteries are dangerous because they don’t work with camera software in the same way as proprietary technologies.
Physical damage
cameras do not like to be dropped. Although it’s not a severe problem with the latest cameras, physical shocks will always affect camera and media performance. Dropping your camera increases the chances it will suffer several faults. The fall may damage sensors or lead to bad connections and loose wiring. All these problems will cause some form of video degradation or corruption.
Human error
Human beings are not perfect; we all make blunders, and sometimes they’re big ones. You may unintentionally delete your videos. Recovering deleted footage may be as simple as looking through your computer’s recycle bin. However, if the footage isn’t there, you may need an advanced solution.
How to Recover and Repair large-sized and complex videos?
Step 1: download Recoverit
To repair your footage, you’ll need wondershare’s desktop recovery software. You may download it by visiting the wonder share website.
If you have the software installed but can’t find it on your desktop, type “Recoverit” into the search bar on your Windows PC, then click the app to run it.
Step 2: choose a location
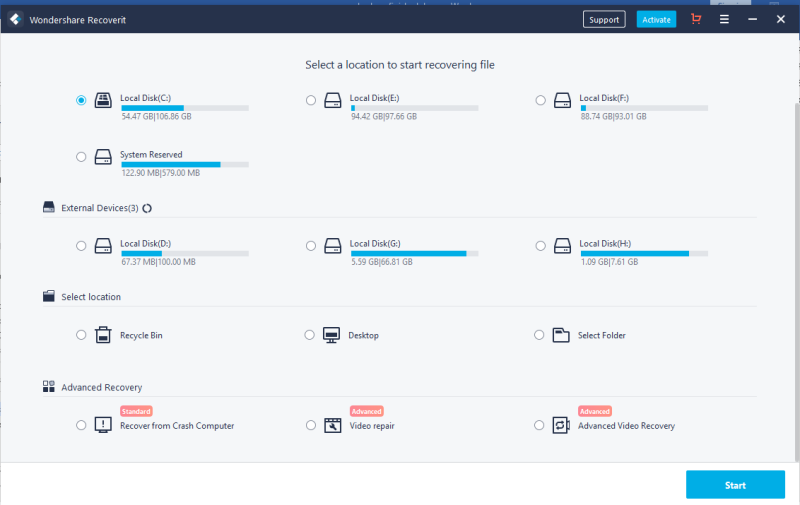
to recover your lost data, you’ll have to show the program where to look. Select the appropriate hard disk from the “hard Disk Drive” section or desktop under the “select location” tab.
Step 3: scan
Now click “start” to start scanning the identified location.
Recoverit will run a comprehensive scan. In most cases, this will take only a few minutes. However, some times the software will take a few hours if it discovers any large-medium sized files.
There’s a quick fix for this issue, though. Starting with Recoverit version 9.0, the scan results will appear within the interface, so you can quickly choose which videos you want to recover. You may also stop the scanning process at your convenience.
Note
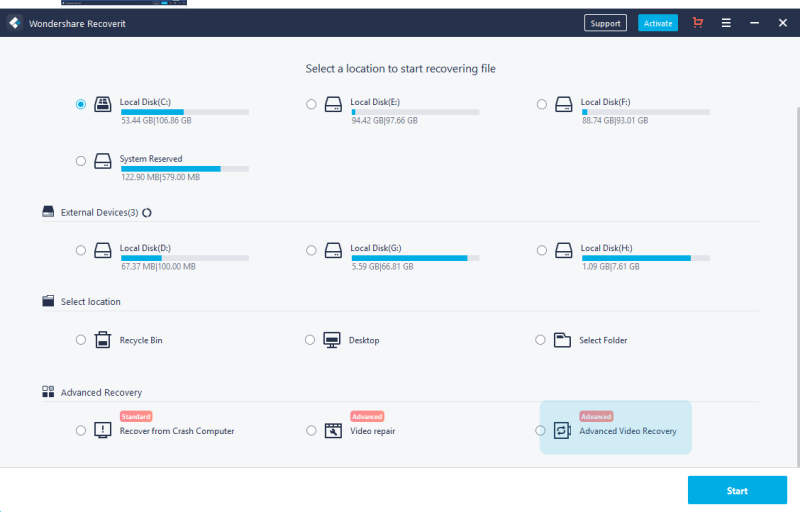
If you’re looking to recover lost or deleted videos, you may select the “advanced video recovery” option at the bottom-left corner of the program’s interface. It will trigger a deep scan for large videos. We’ll cover advanced video repair late in this tutorial.
Step 4: find files
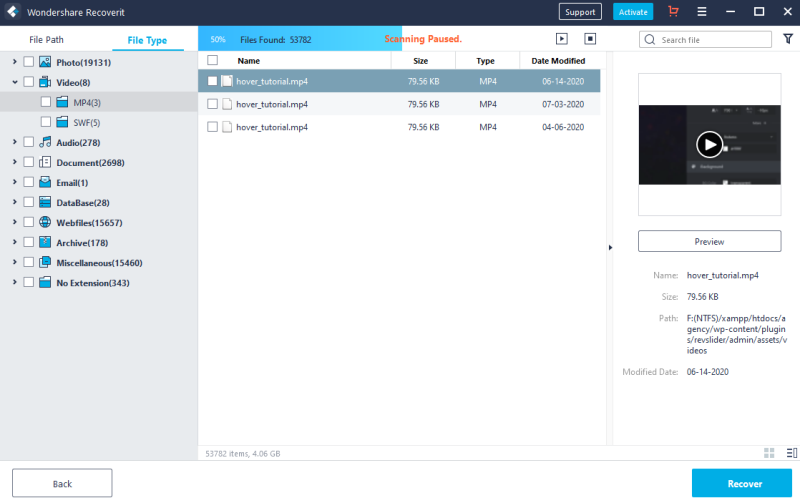
There are two different ways to identify files for recovery: “file path” and “file type.” the “file path” specifies the location where the data is stored. That is, the path to the file. The file type deals with data types and formats. The file you wish to recover may be a video, photo, or audio. If either of these options gives you an overwhelming number of results, you can use another set of filters to refine them. You may filter the files based on properties like size, modification date, and others.
- Show files: this will show all files or only deleted files
- File type: this filter allows you to search for specific file types like photos or videos
- date modified: this will enable you to sort files by the dates when they were changed.
Stop or pause scanning
Once Recoverit starts to scan a particular location for your missing files, you may pause or stop the process with no problems at all. You can pause the process temporarily by hitting the “pause” button. Furthermore, when you find something you want, you can stop the process entirely to proceed with the recovery process.
Step 5: file preview
Recoverit lets you preview videos. Select the file, and a thumbnail preview will show in the right panel.
Selecting a file will also bring up its metadata. This will include details on the file’s exact location, size, and the date it was last modified. If you are unable to preview the files, the program will offer several courses of action. Following them should get the issue sorted.
Step 6: save files
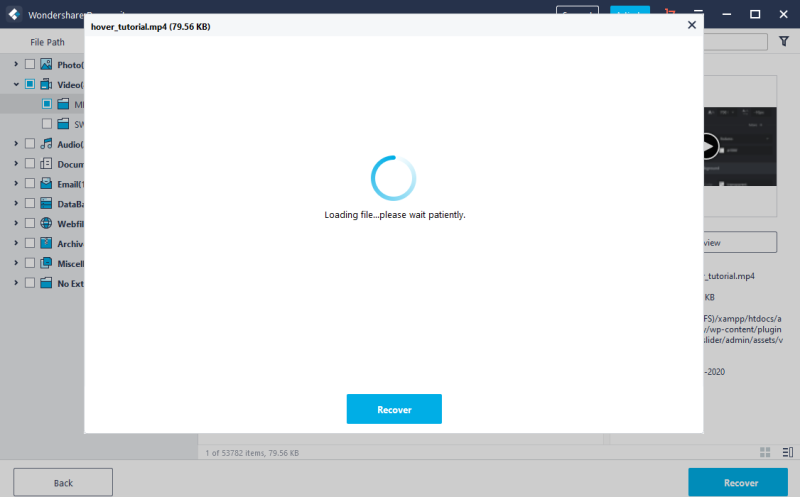
once you’ve identified and reviewed the files, you can recover them. Hit the “recover” option to get your data back. The program will ask you to choose a path to save the recovered files.
Remember not to save the footage to the disk where you depleted or lost the data initially.
Note:
the instructions covered so far apply to recovering data from a computer’s internal hard drive. if you intend to retrieve data from the external media, connect it to your computer then select it from the “external devices” section.
After you’ve done so, please follow the steps mentioned above
Advanced data recovery
Recoverit supports advanced data recovery. You can use this feature to find and recover large, complicated videos.
Step 1: choose advanced recovery
First, you need to select the Advanced recovery option on the interface after you launch the software.
Step 2: Choose a location
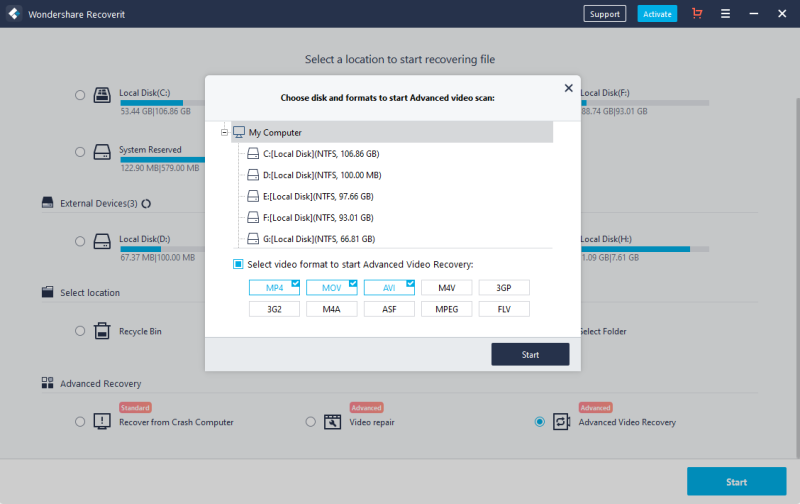
Now select a disk, along with the video formats you want the software to find. The software will have the MP4, MOV, and AVI options ticked by default since they are the most common; you may change choose other formats if the default options don’t match your needs.
The advanced repair option will scan your selected media 2 or three times: The first pass will find lost or incomplete videos. The second scan will combine video fragments, so it might take a while to finish.
Step 3: Preview and recover
The application will show the results of the advanced video recovery process and let you review them.
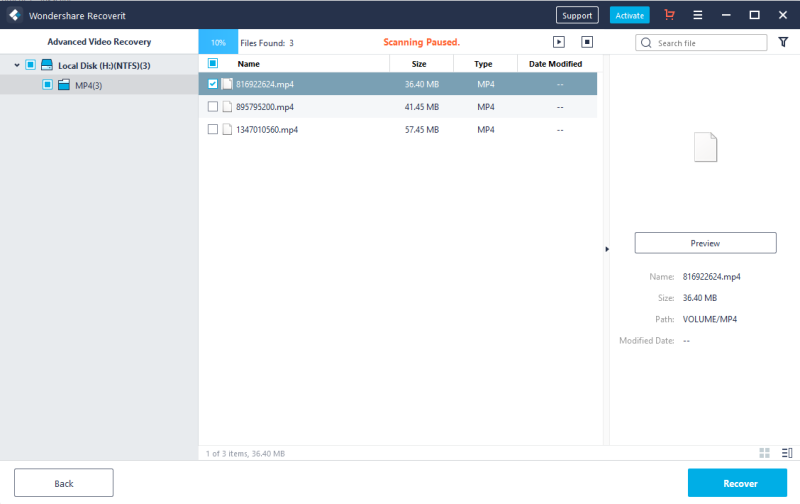
Choose the videos you wish to save, then click the “recover” button. Next, the program will ask you to select a directory to save your video files. Remember to save them in a different location from where they were initially stored.
Conclusion
As you’ve seen in this article, there are several reasons why video loss may occur, like physical damage, human error, and formatting inconsistencies. While it is often frustrating and unexpected, there’s good news. With Recoverit, you can quickly get your videos back. All you have to do is follow the steps outlined above, and you’ll be good to go.
Disclosure: We might earn commission from qualifying purchases. The commission help keep the rest of my content free, so thank you!

