Disclosure: This is a sponsored post, we were compensated to publish this article on our website.
To compare two excel spreadsheets or databases is a very common task. It can be either done by comparing the files manually, by writing a script or with the help of an excel compare tool, which of course is the fastest and the easiest way.
Whether you merge two versions of a customer list or you update a price list, most certainly you will face the challenge to compare two excel files for differences. In this article I will show you step by step, how to compare two excel files, in specific two excel databases, with the help of an excel comparison tool. There are several excel comparison tools available and, for this post, I am using Synkronizer 11.
If the database you want to compare is already in excel, then you are good to go and can start the comparison process right away. However, if your database is not in excel, then you will need to convert your database first into an excel format. Simply save your database as a delimited txt file and convert this into excel.
Since I frequently get questions, what the difference is between a worksheet and a database or how to know what a database is and what not, let me quickly explain the characteristics of a database.

A database is a fixed structure in which the columns define a single field, for example customer name and the rows contain all data of a record, for example all data of a customer. Usually a database has a primary key, such as a customer number, that allows to identify a specific record. A worksheet is a flexible layout in which columns and rows are used in any way a user prefers.
So, if you are not sure if an excel spreadsheet is a worksheet or a database, check if it is a fixed structure with a column header and a single record in each row. If there is no such structure, then it is almost certainly a simple worksheet.
Back to our task, to compare two excel files for differences. As the first step, you will need to select the two databases which you would like to compare.

In my example the worksheet contains three different databases. Each of these three databases includes a different challenge which I will explain now step by step.

Once Synkronizer has matched all worksheets of a workbook, we need to specify each of the worksheets or in this case each of the databases to achieve the most accurate and therefore best results. Start with clicking on the first database named “DB with key” and then select the option “Compare as database” which will trigger an interface for database setting.

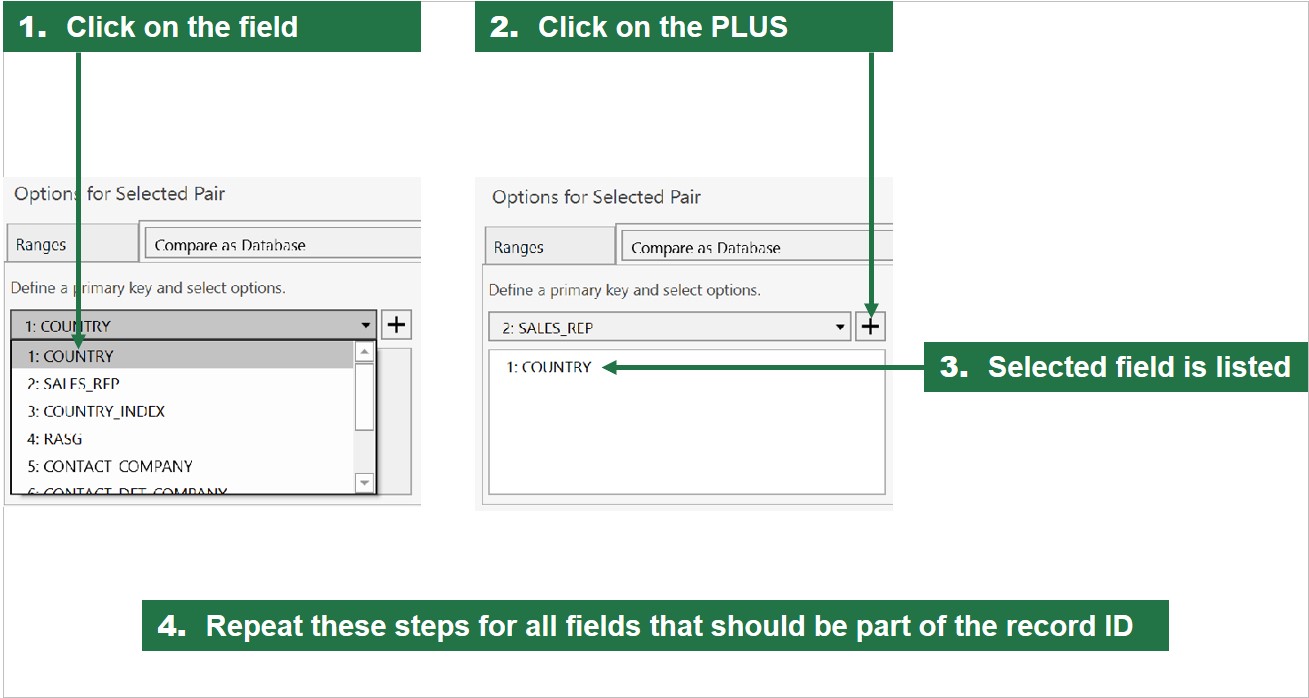
To make sure, the correct primary key is used, Synkronizer requires to select the key manually which can be done by clicking on the drop-down menu, select the primary key and then click on the plus icon.

As soon as the primary key has been selected, it is shown in the listing. All that remains now is to validate the row of the database header, which is in this example on row number one.

With this, the basic setting to compare the database, is done. However, Synkronizer offers a couple more options in the database mode. First you can choose whether to compare the entire database or just a range. Simply drag the cursor in both databases over the area you would like to compare. Of course, if the entire database should be compared, then no setting is required.

You can choose additionally, whether to use relaxed keys, to sort records, to group records or to add a SynkronizerID to each row.

With these few clicks the setting for the first database is completed. These steps will now need to be repeated for all worksheets.
In the case that a database has no primary key, like a customer ID or a record ID, the primary key needs to be created by selecting a string of data fields that can clearly identify a single record.

We have several fields available and, in our example, we choose “COUNTRY”, “SALES_REP”, “CONTACT_COPMANY” and “CONTACT_DET_COMPANY”. Simply click on the field to be selected and click on the plus. This step needs to be repeated for each field that is part of the created record ID. Since there is no record ID which is unique to each record, we have built an ID by combining four selected fields. The combination of these four fields is most likely unique for each record and can therefore serve as a record ID. In the case that the four selected fields are not unique, it will be shown in the results as a duplicated primary key.
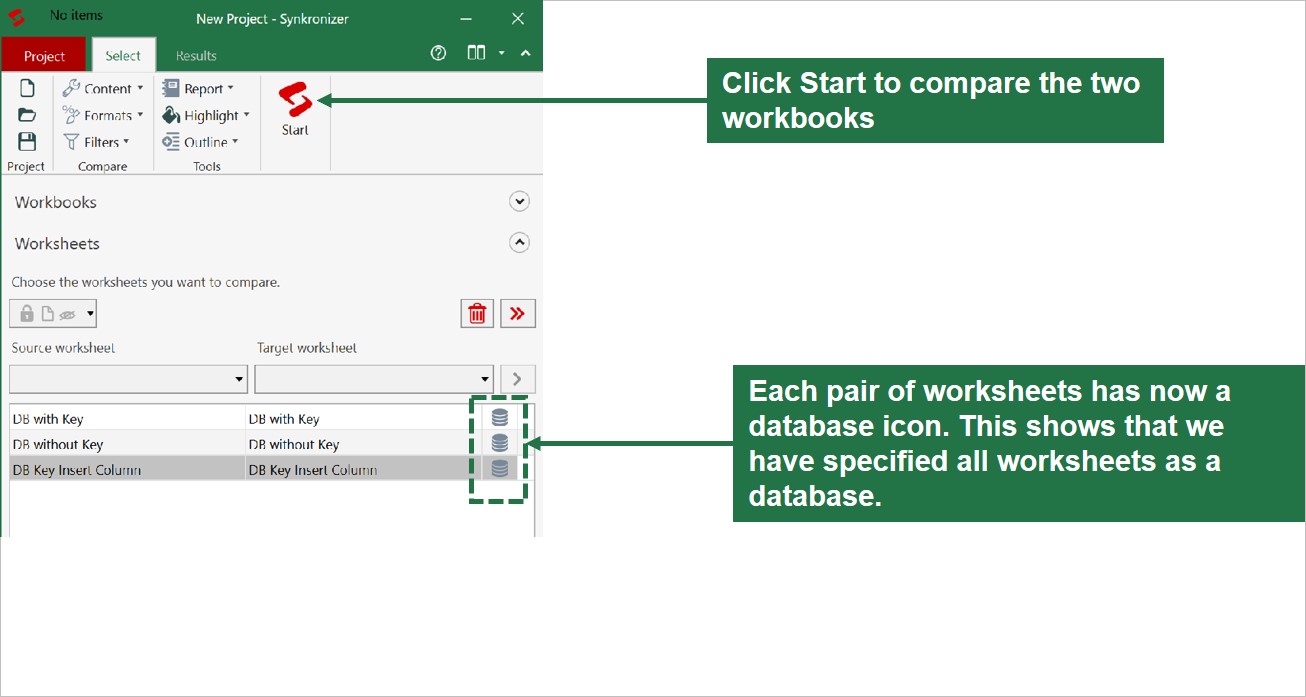
All worksheet pairs of the two workbooks have now a database icon which means that they are ready to be compared as a database. All that’s left now is to click the Start button.
The good thing about Synkronizer is, that it does not really matter how large an Excel database is. It will take a couple of seconds at most to get the results. Once the comparison is done, you see a result summary, detailed differences as well as all the highlighted and color-coded differences in a single interface. It might look a bit confusing at the first glance, but it is quite simple and easy to read. Result Overview, Difference Details and the Color-Coded Differences all serve as a navigation tool. For example, click on any difference type and the differences as well as the options to merge or update these differences are shown. The parallel scrolling, meaning that if you scroll on the target worksheet, the source worksheet will scroll as well, makes working very convenient.
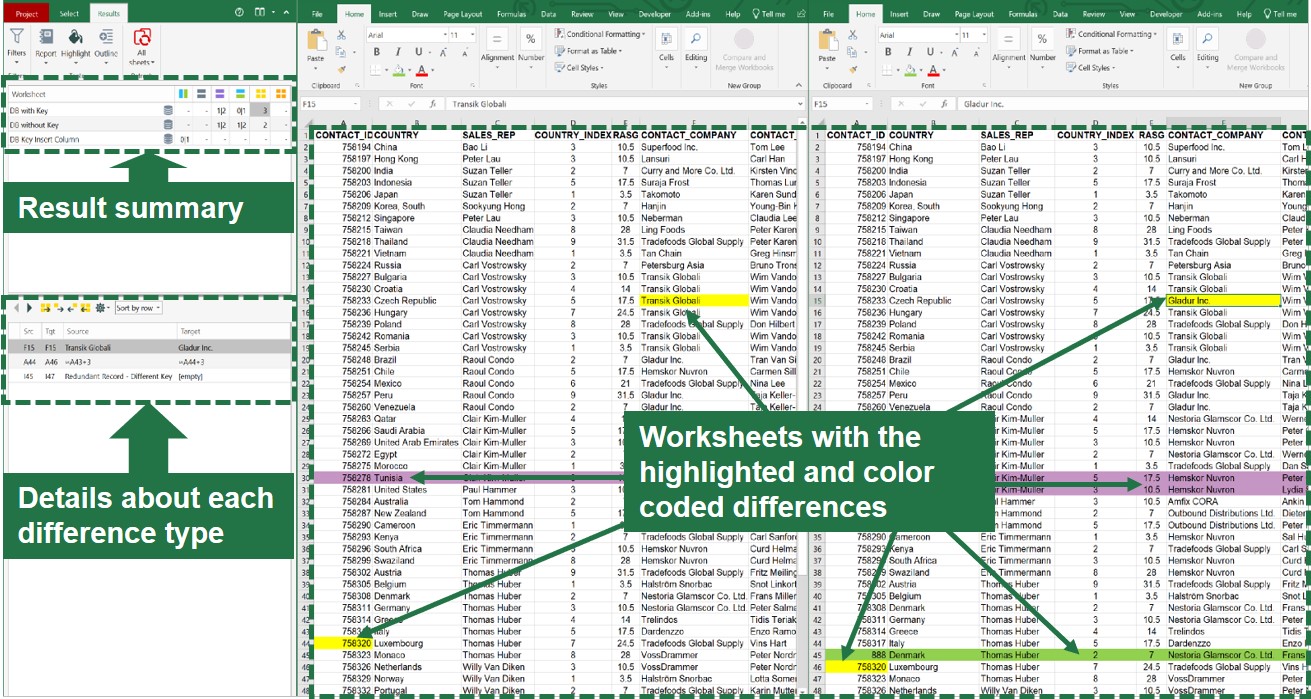
The Result Overview shows the following details:

The Difference Details shows:

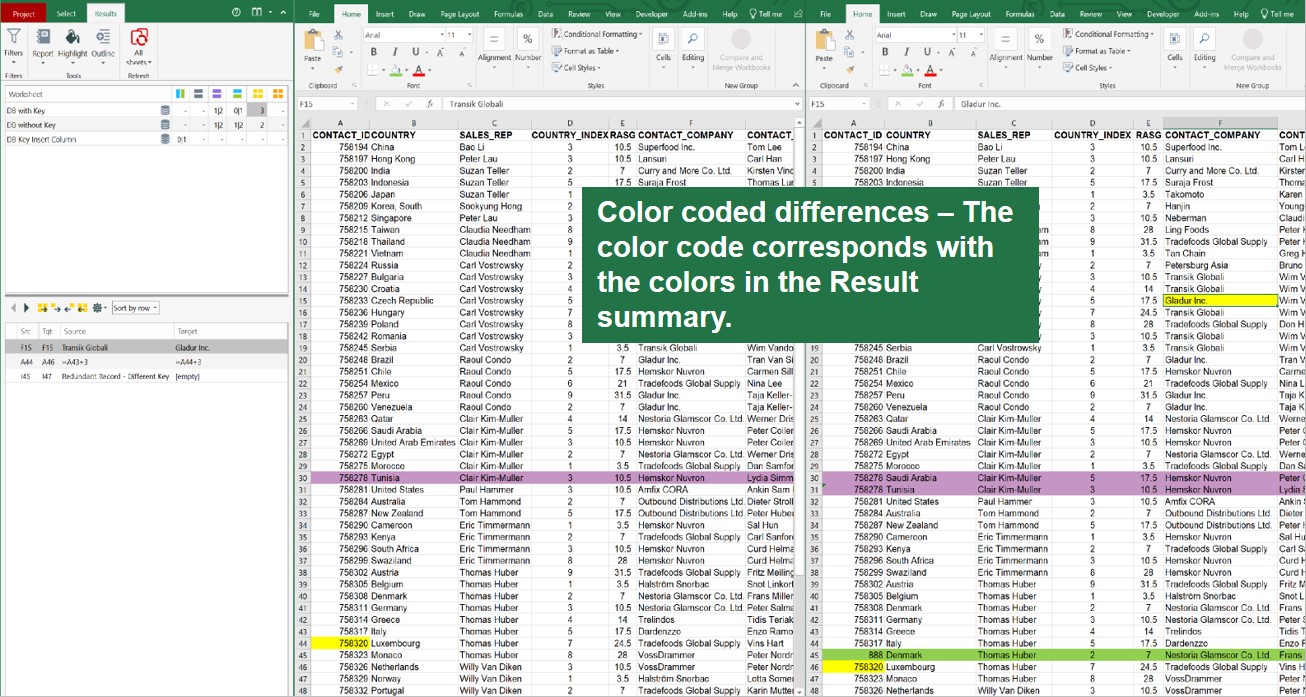
And, finally the Color-Coded Differences highlight all differences in each worksheet. The color-coded highlighting corresponds with the colors in the in the Result Overview. By just looking at the colors of the differences, you know exactly what difference type you are looking at.
At this point I would like to point out two unique features of the excel comparison tool I am using in this example. This is the only tool, that can deal correctly with inserted columns and inserted rows, which are, in my opinion, some of the most challenging difference types.
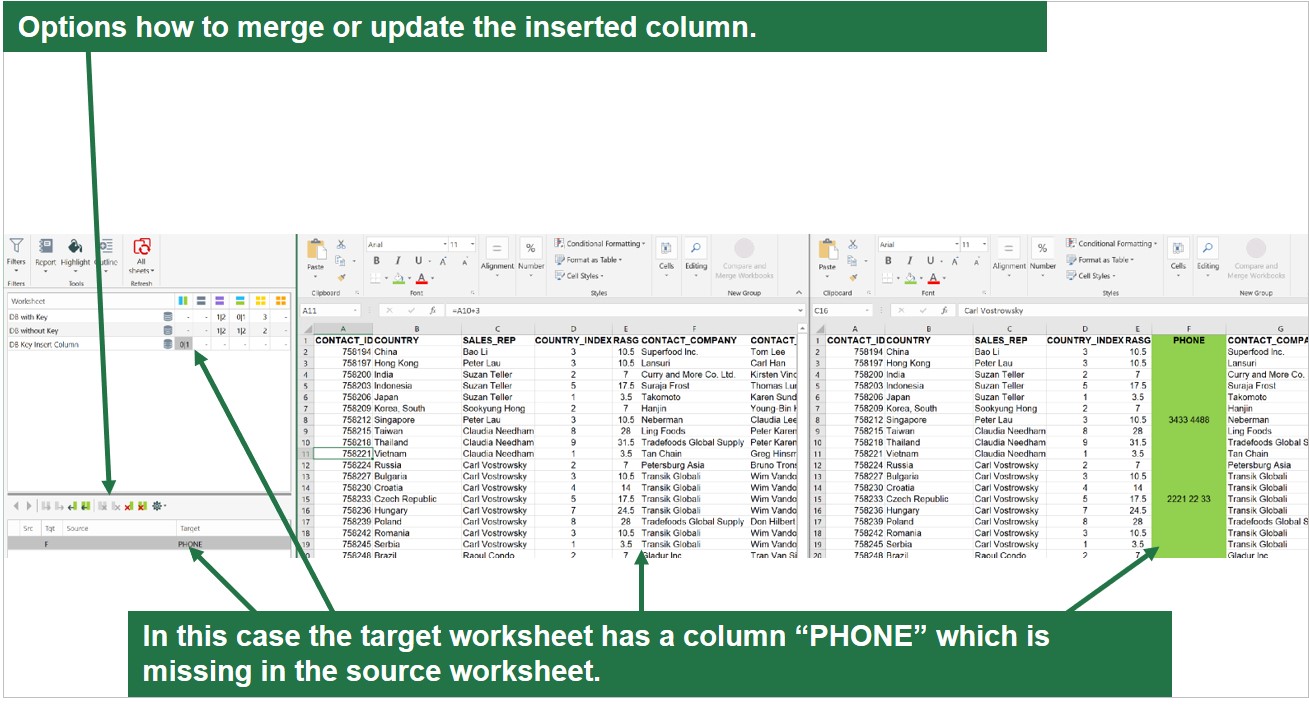
But to compare two excel sheets for differences is only half the task. Once all the differences have been correctly identified and highlighted, a good excel comparison tool should be able to merge or updated these differences. But not only that, a good tool should provide as much flexibility regarding the merging or updating to the user as possible.
Since I need a flexible hence simple merging and updating tool, I am using this one in my daily tasks. The good thing is, with just two clicks (one on the difference type and one on the updating suggestion), all differences can be updated or merged automatically.
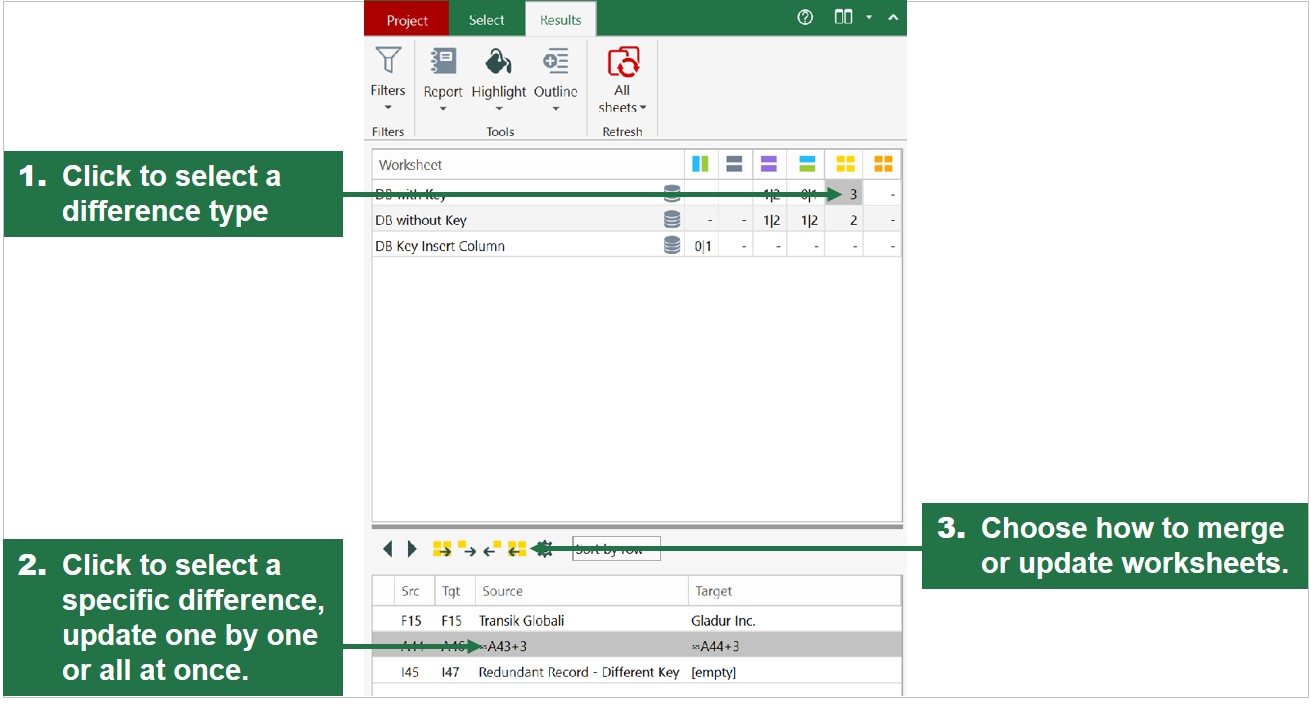
And that’s really it how to compare two databases for differences and to automatically update or merge them. With the right excel comparison tool at hand it is simply a question of a just a couple of clicks.
Disclosure: We might earn commission from qualifying purchases. The commission help keep the rest of my content free, so thank you!


