Disk Drill is a program available that helps to scan your Mac or external hard drive for lost or deleted files, and offers protection for current files. That’s the free version. The version that you can purchase does those things, plus it helps you recover lost files.
The first thing you have to do to recover files on your mac is to download the program from cleverfiles.com. At time of writing, the Pro version costs $89. We recommend that you download the free version first, to scan your drive to ascertain that the deleted or lost files can be recovered. There’s no point in paying money for the Pro version if the files you lost can’t be recovered, right?
After you’ve downloaded the free version, open it up and agree to the license agreement. Drag it into your applications folder. Open the app and click on the “No Thanks” button where it asks you to upgrade to the Pro version. Click on “Recover Data” and this is where you select the drive you want to scan. You can use Disk Drill to look on external hard drives, which is an awesome feature.
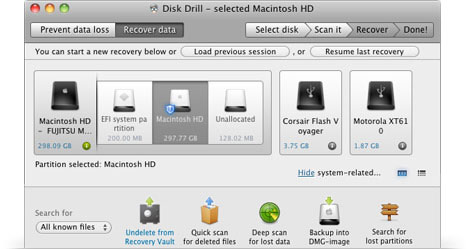
Click on the drive you want to scan, and do a “quick scan” – this takes a few minutes or a few seconds. A deep scan can take up to a couple of hours. Depending on what type of file you are looking to recover, you might have to do a deep scan. If you see any relevant files you might want to recover, then you know it’s safe to pay for the Pro version.
Recoverable files are divided into the type of file they are: audio, photos, or documents, and then further divided by format. You can’t actually see the name of the file, which can be tricky. The search function allows you to narrow down the range. You can preview individual files if you click on them. There is a slight chance that data may be lost during this process.
When you find the file you want to recover, check the box beside that file. Click on “Recover” and the program will automatically open the website where you input payment information. Download the Pro version and go through the steps to open the application.
You have to tell the app to where you want to recover the file. Choose the location, like your desktop, then click on “Choose” then “Recover” then “Pro version.” Enter your name and paste in the code you were given with your purchase. The file will be recovered to the location you chose.
Protection features offered by the basic free version allow you to protect your data ahead of time. You can monitor the health of your hard drive, and receive alerts if something is wrong.
Disclosure: We might earn commission from qualifying purchases. The commission help keep the rest of my content free, so thank you!
